How to Build a ChatGPT APP With Flutter using OpenAI API


Table Of Content
Introduction
What you will learn
Requirements
Creating the Project and Adding Dependencies
Project Structure
Building the Chat UI
ChatGPT API
State Management with Provider
Create DropdownMenuItem
Create and Display Chats with OpenAI
Conclusion
Introduction
In this tutorial, we will learn how to build a complete flutter app that works with the API from OpenAI. This app interacts and chats with OpenAI's ChatGPT using their API. The app will contain various Models, and we will be able to choose between the available models, ask questions and get a response.
It's no longer news that AI has become popular and very important in our daily lives. ChatGPT is one of the most recent advancements in tech. It is playing an important role and solving various problems. Because of its importance, many companies have started building other projects like OpenAI. Since ChatGPT has made its API available for use, we will be using this to our advantage in this tutorial.
As flutter developers, we have a role to play in these recent discoveries. One of the ways to do that is to build an interactive and attractive app that can interact with OpenAI's API or similar APIs. This is what we will build in this tutorial.
What you will learn
By completing this tutorial, you will learn the following
How to build attractive flutter ui
How to work with Restful API
Asynchronous Programming
How to work with state management
Best programming practices
Requirements
To understand this tutorial, you must have/do the following
Basic understanding of Dart and Flutter
Any IDE of your choice. I will be using visual studio code
Flutter Environment set up on your local machine
Read through all the lines of codes
Attention to detail.
Creating the Project and Adding Dependencies
To start this project, Navigate to the directory where you would like to create the project and type the below command in your terminal.
flutter create chat_gpt_tutorial
Open the project in your preferred IDE.
Add the following dependencies to pubspec.yaml file.
Your pubspec.yaml file should look like the below
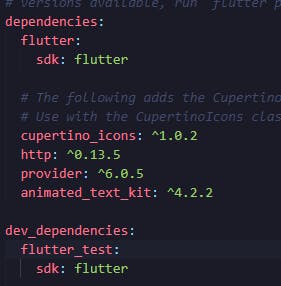
Let's explain the reasons we need these packages
http - to interact with restful API
provider - to manage our state
animated_text_kit to animate our texts
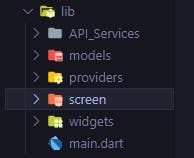
Project Structure
create the following folders under lib folder
models
providers
screens
widgets
API_Services
The project structure will look like this one
Building the chat UI
Now that we have created all the folders that we need, Let's start writing code to design the UI of the app. Replace the code in main file with this.
import 'package:chat_gpt_tutorial/screens/chat_screen.dart';
import 'package:flutter/material.dart';

void main() {
  runApp(const MyApp());
}

class MyApp extends StatelessWidget {
  const MyApp({super.key});

  // This widget is the root of your application.
  @override
  Widget build(BuildContext context) {
    return MaterialApp(
      debugShowCheckedModeBanner: false,
      title: 'Chat GPT',
      theme: ThemeData(
        scaffoldBackgroundColor: Color.fromRGBO(68, 70, 84, 1),
        appBarTheme: AppBarTheme(
          color: Color.fromRGBO(52, 53, 65, 1),
        ),
      ),
      home: const ChatScreen(),
    );
  }
}
In the above code, we have the ChatScreen widget imported and used. This will be the main page of the app and that's what we will display when we run the app.
Now let's work on the ChatScreen since we want to use it.
Navigate to one of the folders we created earlier named screens.
Create a file and name it chat_screen.dart.
It should look like the one below
let's create a placeholder for our chat screen by manually creating the chat UI before using the API. Paste the below code inside chat_screen file.
import 'package:flutter/material.dart';
import 'package:flutter/src/widgets/framework.dart';
import 'package:flutter/src/widgets/placeholder.dart';

class ChatScreen extends StatefulWidget {
  const ChatScreen({super.key});

  @override
  State<ChatScreen> createState() => _ChatScreenState();
}

class _ChatScreenState extends State<ChatScreen> {
  final chats = [
    {
      "msg": "Hello, can you tell me about yourself?",
      "chatIndex": 0,
    },
    {
      "msg":
          "Hello, I am ChatGPT, a large language model developed by OpenAI. I am here to assist you with any information or questions you may have. How can I help you today?",
      "chatIndex": 1,
    },
    {
      "msg": "What is stateful widget in flutter?",
      "chatIndex": 0,
    },
    {
      "msg":
          "A StatefulWidget is a special type of widget in Flutter that maintains state across multiple builds of the widget. The state is stored in a State object and is accessible through the widget’s build method. This allows the widget to update its state, and thus the UI, whenever the state object changes.",
      "chatIndex": 1,
    },
    {
      "msg": "Okay thanks",
      "chatIndex": 0,
    },
    {
      "msg":
          "You're welcome! Let me know if you have any other questions or if there's anything else I can help you with.",
      "chatIndex": 1,
    },
  ];
  @override
  Widget build(BuildContext context) {
    return Scaffold(
      appBar: AppBar(
        title: const Text("ChatGPT"),
        actions: [
          IconButton(
              onPressed: () async {},
              icon: const Icon(
                Icons.more_vert_rounded,
                color: Colors.white,
              ))
        ],
        elevation: 2,
      ),
      body: Column(
        children: [
          Flexible(
            child: ListView.builder(
              itemCount: chats.length,
              itemBuilder: (context, index) {
                return Column(
                  children: [
                    Material(
                      color: chats[index]['chatIndex'] == 0
                          ? Color.fromRGBO(68, 70, 84, 1)
                          : Color.fromRGBO(52, 53, 65, 1),
                      child: Padding(
                        padding: const EdgeInsets.all(8.0),
                        child: Row(
                          children: [
                            Expanded(
                                child: Padding(
                              padding: const EdgeInsets.all(8.0),
                              child: Text(
                                chats[index]["msg"].toString(),
                                style: TextStyle(
                                    fontSize: 16, color: Colors.white),
                              ),
                            ))
                          ],
                        ),
                      ),
                    )
                  ],
                );
              },
            ),
          ),
          Material(
            color: Color.fromRGBO(52, 53, 65, 1),
            child: Padding(
              padding: const EdgeInsets.all(8.0),
              child: Row(
                children: [
                  Expanded(
                      child: TextField(
                    style: TextStyle(color: Colors.white),
                    onSubmitted: (value) async {},
                    decoration: InputDecoration.collapsed(
                        hintText: "Hi, type your message here",
                        hintStyle: TextStyle(color: Colors.grey)),
                  )),
                  IconButton(
                      onPressed: () async {},
                      icon: const Icon(
                        Icons.send,
                        color: Colors.white,
                      ))
                ],
              ),
            ),
          ),
        ],
      ),
    );
  }
}
This is how our chat ui will look like after
Here is the explanation of the above code
We created a list called "chats"
We used ListView.Builder to display the chats.
ChatGPT API
Now that we have created the UI of our app. It is time to use the API from OpenAI.
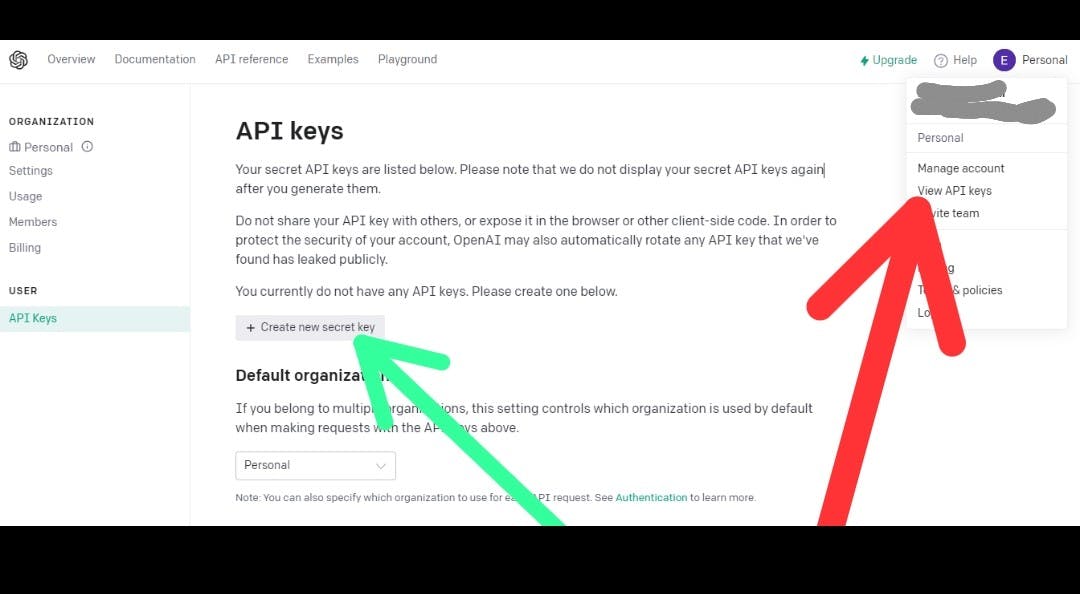
Head over to OpenAI website to create an account and get an API Key, click here
Click on the profile section at the top right
Click on View API keys.
check the picture below
Copy the API key and save it somewhere because we will use it soon.
Now, let's create two files under the model folder and create two class models that will interact with the API. Name them
chat_Model.dart
open_AIModel.dart
Check the picture below

open chat_Model.dart and paste the code below
class ChatModel {
  final String msg;
  final int chatIndex;

  ChatModel({required this.msg, required this.chatIndex});

  factory ChatModel.fromJson(Map<String, dynamic> json) => ChatModel(
        msg: json["msg"],
        chatIndex: json["chatIndex"],
      );
}
Open open_AI_Model file and paste the below code
class OpenaiModel {
  final String id;
  final int created;
  final String root;

  OpenaiModel({required this.id, required this.created, required this.root});

  factory OpenaiModel.fromJson(Map<String, dynamic> json) => OpenaiModel(
        id: json["id"],
        created: json["created"],
        root: json["root"],
      );

  static List<OpenaiModel> modelsFromSnapshot(List modelSnapshot) {
    return modelSnapshot.map((e) => OpenaiModel.fromJson(e)).toList();
  }
}
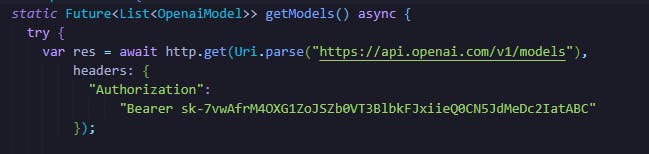
Let's create the function that will fetch the Models and send messages to openAI's API. To achieve this, we will use the HTTP package we added earlier.
Create a file under API_Services and name it api_services.dart. Copy and paste the below code inside it.
import 'dart:convert';
import 'dart:io';
import 'package:chat_gpt_tutorial/models/chat_Model.dart';
import 'package:chat_gpt_tutorial/models/open_AI_Model.dart';
import 'package:http/http.dart' as http;

class ApiServices {
  static Future<List<OpenaiModel>> getModels() async {
    try {
      var res = await http.get(Uri.parse("https://api.openai.com/v1/models"),
          headers: {
            "Authorization":
                "Bearer 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"
          });

      Map response = jsonDecode(res.body);

      if (response["error"] != null) {
        throw HttpException(response["error"]["message"]);
      }
      print(res);
      List models = [];
      for (var model in response["data"]) {
        models.add(model);
        print(model);
      }
      return OpenaiModel.modelsFromSnapshot(models);
    } catch (e) {
      print(" $e");
      rethrow;
    }
  }

  static Future<List<ChatModel>> sendAndRecieveMessages(
      {required String message, required String modelId}) async {
    try {
      var response = await http.post(
        Uri.parse("https://api.openai.com/v1/completions"),
        headers: {
          "Authorization":
              "Bearer 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",
          "Content-Type": "application/json"
        },
        body: jsonEncode(
            {"model": modelId, "prompt": message, "max_tokens": 100}),
      );

      Map jsonResponse = jsonDecode(response.body);

      if (jsonResponse["error"] != null) {
        throw HttpException(jsonResponse["error"]["message"]);
      }
      List<ChatModel> chats = [];
      if (jsonResponse["choices"].length > 0) {
        chats = List.generate(
            jsonResponse["choices"].length,
            (index) => ChatModel(
                  msg: jsonResponse["choices"][index]["text"],
                  chatIndex: 1,
                ));
      }
      return chats;
    } catch (e) {
      print(e);
      rethrow;
    }
  }
}
Here is a brief explanation of the two functions in the above code
getModels - fetches list of models from the API "api.openai.com/v1/models"
sendAndReceiveMessages - sends a post request to the API "api.openai.com/v1/completions" and gets a response in return.
In the above code, we need to replace Your_API_Key with the actual key we copied from OpenAI website in the two functions.
It should look like the image below

State Management with Provider
Because the result of models from the API is a list. We need to work on keeping the state of each model whenever we click any of them. We will use the provider package we installed earlier.
First of all, we need to wrap our code in main file with MultiProvider.
Create a file in the providers' folder and name it getModel_provider.dart. It will look like the one below
Copy and paste this code into the file
import 'package:chat_gpt_tutorial/models/open_AI_Model.dart';
import 'package:flutter/material.dart';

import '../API_Services/api_services.dart';

class ModelsProvider with ChangeNotifier {
  List<OpenaiModel> modelsList = [];
  String currentModel = "text-davinci-003";

  List<OpenaiModel> get getModelsList {
    return modelsList;
  }

  String get getCurrentModel {
    return currentModel;
  }

  void setCurrentModel(String newModel) {
    currentModel = newModel;

    notifyListeners();
  }

  Future<List<OpenaiModel>> getAllModels() async {
    modelsList = await ApiServices.getModels();
    return modelsList;
  }
}
Let's explain the above code
modelsList stores all the models
currentModel sets "text-davinci-003" as the default model for our app.
getCurrentModel sets the model to the clicked model.
setCurrentModel sets currentModel.
getAllModels fetches the model result from the API
We can now wrap the parent widget in main file with MultiProvider.
Replace the code in main file with the code below or simply make changes to the existing code
import 'package:chat_gpt_tutorial/providers/getModel_provider.dart';
import 'package:chat_gpt_tutorial/screens/chat_screen.dart';
import 'package:flutter/material.dart';
import 'package:provider/provider.dart';

void main() {
  runApp(const MyApp());
}

class MyApp extends StatelessWidget {
  const MyApp({super.key});

  // This widget is the root of your application.
  @override
  Widget build(BuildContext context) {
    return MultiProvider(
      providers: [ChangeNotifierProvider(create: (_) => ModelsProvider())],
      child: MaterialApp(
        debugShowCheckedModeBanner: false,
        title: 'Chat GPT',
        theme: ThemeData(
          scaffoldBackgroundColor: Color.fromRGBO(68, 70, 84, 1),
          appBarTheme: AppBarTheme(
            color: Color.fromRGBO(52, 53, 65, 1),
          ),
        ),
        home: const ChatScreen(),
      ),
    );
  }
}
This code above makes sure that MaterialApp widget is wrapped with ChangeNotifierProvider. This allows the app to listen to changes and update itself accordingly.
Create DropDownMenuItem
Let's use a drop-down widget to show all the models from OpenAI's API. We will create the dropdown and use the provider package to manage the state.
Navigate to the widgets folder
create a file and name it dropdown.dart.
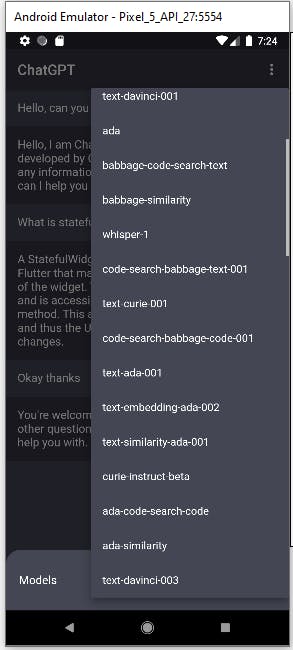
It should look like the picture below

Paste this code inside the file
import 'package:chat_gpt_tutorial/providers/getModel_provider.dart';
import 'package:flutter/material.dart';
import 'package:provider/provider.dart';

class ModelsDropDown extends StatefulWidget {
  const ModelsDropDown({super.key});

  @override
  State<ModelsDropDown> createState() => _ModelsDropDownState();
}

class _ModelsDropDownState extends State<ModelsDropDown> {
  String? currentModel;
  @override
  Widget build(BuildContext context) {
    final modelsProvider = Provider.of<ModelsProvider>(context, listen: false);
    currentModel = modelsProvider.getCurrentModel;
    return FutureBuilder(
        future: modelsProvider.getAllModels(),
        builder: (context, snapshot) {
          if (snapshot.hasError) {
            return Center(
              child: Text(snapshot.error.toString()),
            );
          }
          return snapshot.data == null || snapshot.data!.isEmpty
              ? const SizedBox.shrink()
              : FittedBox(
                  child: DropdownButton(
                      dropdownColor: Color.fromRGBO(68, 70, 84, 1),
                      iconEnabledColor: Colors.white,
                      items: List<DropdownMenuItem<String>>.generate(
                        snapshot.data!.length,
                        (index) => DropdownMenuItem(
                          value: snapshot.data![index].id,
                          child: Text(
                            snapshot.data![index].id,
                            style: TextStyle(fontSize: 15, color: Colors.white),
                          ),
                        ),
                      ),
                      value: currentModel,
                      onChanged: (value) {
                        setState(() {
                          currentModel = value.toString();
                        });
                        modelsProvider.setCurrentModel(
                          value.toString(),
                        );
                      }),
                );
        });
  }
}
Here is a brief explanation of the above code
We get ModelsProvider from getModel_provider file
We use the future property in futurebuilder to get the model list from ModelsProvider
We get the snapshot data and use DropDownMenuItem to display the result.
Now, let's create a function to show the dropdown when we click on the more_vert_rounded icon in the appbar in the chat_screen file.
Copy and paste the below code inside the onPressed function of the IconButton in chat_screen file's appbar
  showModalBottomSheet(
                    shape: const RoundedRectangleBorder(
                        borderRadius:
                            BorderRadius.vertical(top: Radius.circular(20))),
                    backgroundColor: Color.fromRGBO(9, 9, 9, 1),
                    context: context,
                    builder: (context) {
                      return Padding(
                        padding: const EdgeInsets.all(18.0),
                        child: Row(
                          mainAxisAlignment: MainAxisAlignment.spaceBetween,
                          children: [
                            Flexible(
                              child: Text(
                                "Models",
                                style: TextStyle(
                                    fontSize: 16, color: Colors.white),
                              ),
                            ),
                            Flexible(flex: 2, child: ModelsDropDown())
                          ],
                        ),
                      );
                    });
Here is the chat_screen file updated code. You can copy and replace the entire code with the below code
 import 'package:chat_gpt_tutorial/widgets/dropdown.dart';
import 'package:flutter/material.dart';
import 'package:flutter/src/widgets/framework.dart';
import 'package:flutter/src/widgets/placeholder.dart';

class ChatScreen extends StatefulWidget {
  const ChatScreen({super.key});

  @override
  State<ChatScreen> createState() => _ChatScreenState();
}

class _ChatScreenState extends State<ChatScreen> {
  final chats = [
    {
      "msg": "Hello, can you tell me about yourself?",
      "chatIndex": 0,
    },
    {
      "msg":
          "Hello, I am ChatGPT, a large language model developed by OpenAI. I am here to assist you with any information or questions you may have. How can I help you today?",
      "chatIndex": 1,
    },
    {
      "msg": "What is stateful widget in flutter?",
      "chatIndex": 0,
    },
    {
      "msg":
          "A StatefulWidget is a special type of widget in Flutter that maintains state across multiple builds of the widget. The state is stored in a State object and is accessible through the widget’s build method. This allows the widget to update its state, and thus the UI, whenever the state object changes.",
      "chatIndex": 1,
    },
    {
      "msg": "Okay thanks",
      "chatIndex": 0,
    },
    {
      "msg":
          "You're welcome! Let me know if you have any other questions or if there's anything else I can help you with.",
      "chatIndex": 1,
    },
  ];
  @override
  Widget build(BuildContext context) {
    return Scaffold(
      appBar: AppBar(
        title: const Text("ChatGPT"),
        actions: [
          IconButton(
              onPressed: () async {
                showModalBottomSheet(
                    shape: const RoundedRectangleBorder(
                        borderRadius:
                            BorderRadius.vertical(top: Radius.circular(20))),
                    backgroundColor: Color.fromRGBO(68, 70, 84, 1),
                    context: context,
                    builder: (context) {
                      return Padding(
                        padding: const EdgeInsets.all(18.0),
                        child: Row(
                          mainAxisAlignment: MainAxisAlignment.spaceBetween,
                          children: [
                            Flexible(
                              child: Text(
                                "Models",
                                style: TextStyle(
                                    fontSize: 16, color: Colors.white),
                              ),
                            ),
                            Flexible(flex: 2, child: ModelsDropDown())
                          ],
                        ),
                      );
                    });
              },
              icon: const Icon(
                Icons.more_vert_rounded,
                color: Colors.white,
              ))
        ],
        elevation: 2,
      ),
      body: Column(
        children: [
          Flexible(
            child: ListView.builder(
              itemCount: chats.length,
              itemBuilder: (context, index) {
                return Column(
                  children: [
                    Material(
                      color: chats[index]['chatIndex'] == 0
                          ? Color.fromRGBO(68, 70, 84, 1)
                          : Color.fromRGBO(52, 53, 65, 1),
                      child: Padding(
                        padding: const EdgeInsets.all(8.0),
                        child: Row(
                          children: [
                            Expanded(
                                child: Padding(
                              padding: const EdgeInsets.all(8.0),
                              child: Text(
                                chats[index]["msg"].toString(),
                                style: TextStyle(
                                    fontSize: 16, color: Colors.white),
                              ),
                            ))
                          ],
                        ),
                      ),
                    )
                  ],
                );
              },
            ),
          ),
          Material(
            color: Color.fromRGBO(52, 53, 65, 1),
            child: Padding(
              padding: const EdgeInsets.all(8.0),
              child: Row(
                children: [
                  Expanded(
                      child: TextField(
                    style: TextStyle(color: Colors.white),
                    onSubmitted: (value) async {},
                    decoration: InputDecoration.collapsed(
                        hintText: "Hi, type your message here",
                        hintStyle: TextStyle(color: Colors.grey)),
                  )),
                  IconButton(
                      onPressed: () async {},
                      icon: const Icon(
                        Icons.send,
                        color: Colors.white,
                      ))
                ],
              ),
            ),
          ),
        ],
      ),
    );
  }
}
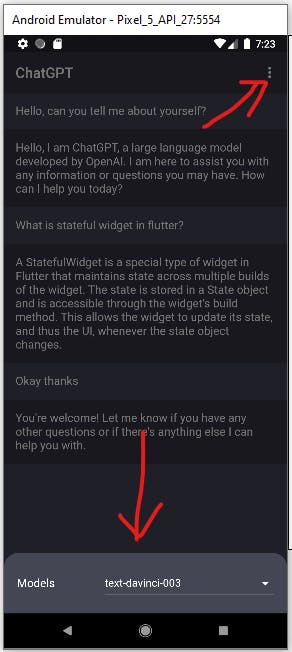
By now our app should look like what is in the pictures below.
Create and Display chats with OpenAI
We have successfully displayed the list of models in our app. It is time to show our chats with OpenAI. It's time to replace the chat list we created manually with a dynamic one that will contain our questions and the answers from ChatGPT.
Replace the code in the chat_screen file with the code below.
import 'package:chat_gpt_tutorial/API_Services/api_services.dart';
import 'package:chat_gpt_tutorial/models/chat_Model.dart';
import 'package:chat_gpt_tutorial/widgets/dropdown.dart';
import 'package:flutter/material.dart';
import 'package:flutter/src/widgets/framework.dart';
import 'package:flutter/src/widgets/placeholder.dart';
import 'package:provider/provider.dart';
import 'package:animated_text_kit/animated_text_kit.dart';

import '../providers/getModel_provider.dart';

class ChatScreen extends StatefulWidget {
  const ChatScreen({super.key});

  @override
  State<ChatScreen> createState() => _ChatScreenState();
}

class _ChatScreenState extends State<ChatScreen> {
  late TextEditingController textEditingController;
  @override
  void initState() {
    textEditingController = TextEditingController();
    _chatScroll = ScrollController();
    focusNode = FocusNode();
    super.initState();
  }

  @override
  void dispose() {
    textEditingController.dispose();
    _chatScroll.dispose();
    focusNode.dispose();
    super.dispose();
  }

  List<ChatModel> chats = [];
  late ScrollController _chatScroll;
  late FocusNode focusNode;
  void scrollDown() {
    _chatScroll.animateTo(_chatScroll.position.maxScrollExtent,
        duration: const Duration(seconds: 2), curve: Curves.easeInOut);
  }

  Future<void> sendMessageToOpenAi({
    required ModelsProvider modelsProvider,
  }) async {
    if (textEditingController.text.isEmpty) {
      ScaffoldMessenger.of(context).showSnackBar(
        const SnackBar(
          content: Text("You can't send multiple messages"),
          backgroundColor: Colors.red,
        ),
      );
      return;
    }
    try {
      String message = textEditingController.text;
      setState(() {
        chats.add(ChatModel(msg: textEditingController.text, chatIndex: 0));
        textEditingController.clear();
        focusNode.unfocus();
      });
      chats.addAll(await ApiServices.sendAndRecieveMessages(
          message: message, modelId: modelsProvider.getCurrentModel));

      setState(() {});
    } catch (e) {
      ScaffoldMessenger.of(context).showSnackBar(
        SnackBar(
          content: Text(e.toString()),
          backgroundColor: Colors.red,
        ),
      );
    } finally {
      setState(() {
        scrollDown();
      });
    }
  }

  @override
  Widget build(BuildContext context) {
    final modelsProvider = Provider.of<ModelsProvider>(context, listen: false);

    return Scaffold(
      appBar: AppBar(
        title: const Text("ChatGPT"),
        actions: [
          IconButton(
              onPressed: () async {
                showModalBottomSheet(
                    shape: const RoundedRectangleBorder(
                        borderRadius:
                            BorderRadius.vertical(top: Radius.circular(20))),
                    backgroundColor: Color.fromRGBO(68, 70, 84, 1),
                    context: context,
                    builder: (context) {
                      return Padding(
                        padding: const EdgeInsets.all(18.0),
                        child: Row(
                          mainAxisAlignment: MainAxisAlignment.spaceBetween,
                          children: [
                            Flexible(
                              child: Text(
                                "Models",
                                style: TextStyle(
                                    fontSize: 16, color: Colors.white),
                              ),
                            ),
                            Flexible(flex: 2, child: ModelsDropDown())
                          ],
                        ),
                      );
                    });
              },
              icon: const Icon(
                Icons.more_vert_rounded,
                color: Colors.white,
              ))
        ],
        elevation: 2,
      ),
      body: Column(
        children: [
          Flexible(
            child: ListView.builder(
              controller: _chatScroll,
              itemCount: chats.length,
              itemBuilder: (context, index) {
                return Column(
                  children: [
                    Material(
                      color: chats[index].chatIndex == 0
                          ? Color.fromRGBO(68, 70, 84, 1)
                          : Color.fromRGBO(52, 53, 65, 1),
                      child: Padding(
                        padding: const EdgeInsets.all(8.0),
                        child: Row(
                          children: [
                            Expanded(
                                child: Padding(
                              padding: const EdgeInsets.all(8.0),
                              child: chats[index].chatIndex == 0
                                  ? Text(
                                      chats[index].msg.toString(),
                                      style: TextStyle(
                                          fontSize: 16, color: Colors.white),
                                    )
                                  : DefaultTextStyle(
                                      style: TextStyle(
                                          color: Colors.white,
                                          fontWeight: FontWeight.w700,
                                          fontSize: 16),
                                      child: AnimatedTextKit(
                                        isRepeatingAnimation: false,
                                        repeatForever: false,
                                        displayFullTextOnTap: true,
                                        totalRepeatCount: 1,
                                        animatedTexts: [
                                          TyperAnimatedText(
                                            chats[index].msg.toString().trim(),
                                          )
                                        ],
                                      ),
                                    ),
                            ))
                          ],
                        ),
                      ),
                    )
                  ],
                );
              },
            ),
          ),
          Material(
            color: Color.fromRGBO(52, 53, 65, 1),
            child: Padding(
              padding: const EdgeInsets.all(8.0),
              child: Row(
                children: [
                  Expanded(
                      child: TextField(
                    focusNode: focusNode,
                    controller: textEditingController,
                    style: TextStyle(color: Colors.white),
                    onSubmitted: (value) async {
                      await sendMessageToOpenAi(
                        modelsProvider: modelsProvider,
                      );
                    },
                    decoration: InputDecoration.collapsed(
                        hintText: "How can I help you",
                        hintStyle: TextStyle(color: Colors.grey)),
                  )),
                  IconButton(
                      onPressed: () async {
                        await sendMessageToOpenAi(
                            modelsProvider: modelsProvider);
                      },
                      icon: const Icon(
                        Icons.send,
                        color: Colors.white,
                      ))
                ],
              ),
            ),
          ),
        ],
      ),
    );
  }
}
Here is a brief explanation of the above code
We created an empty list and named it chats
The function "sendMessageToOpenAI" appends our messages and Open AI responses to the chats list
We used ListView.Builder to display the chats list.
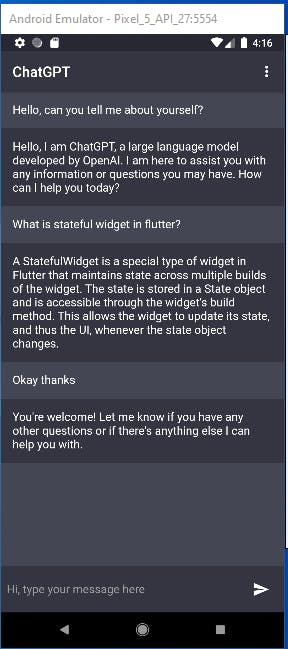
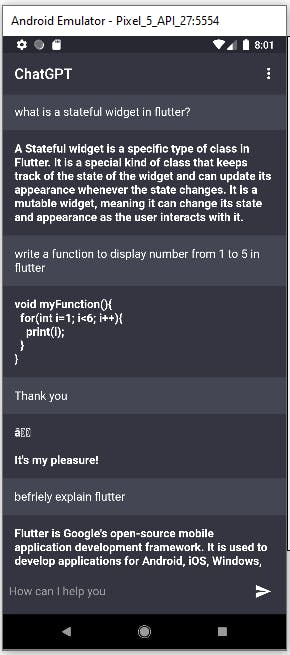
If you have followed this tutorial up to this point, you should be able to send a message and get a response from the OpenAI API.
Check my interaction below:
Conclusion
In this tutorial, we have been able to cover important aspects of flutter development. I would advise that you take time to go through the codes and files one after the other. This will help you to better understand everything we have done.
Keep practicing and keep pushing.
Happy coding!